# Support

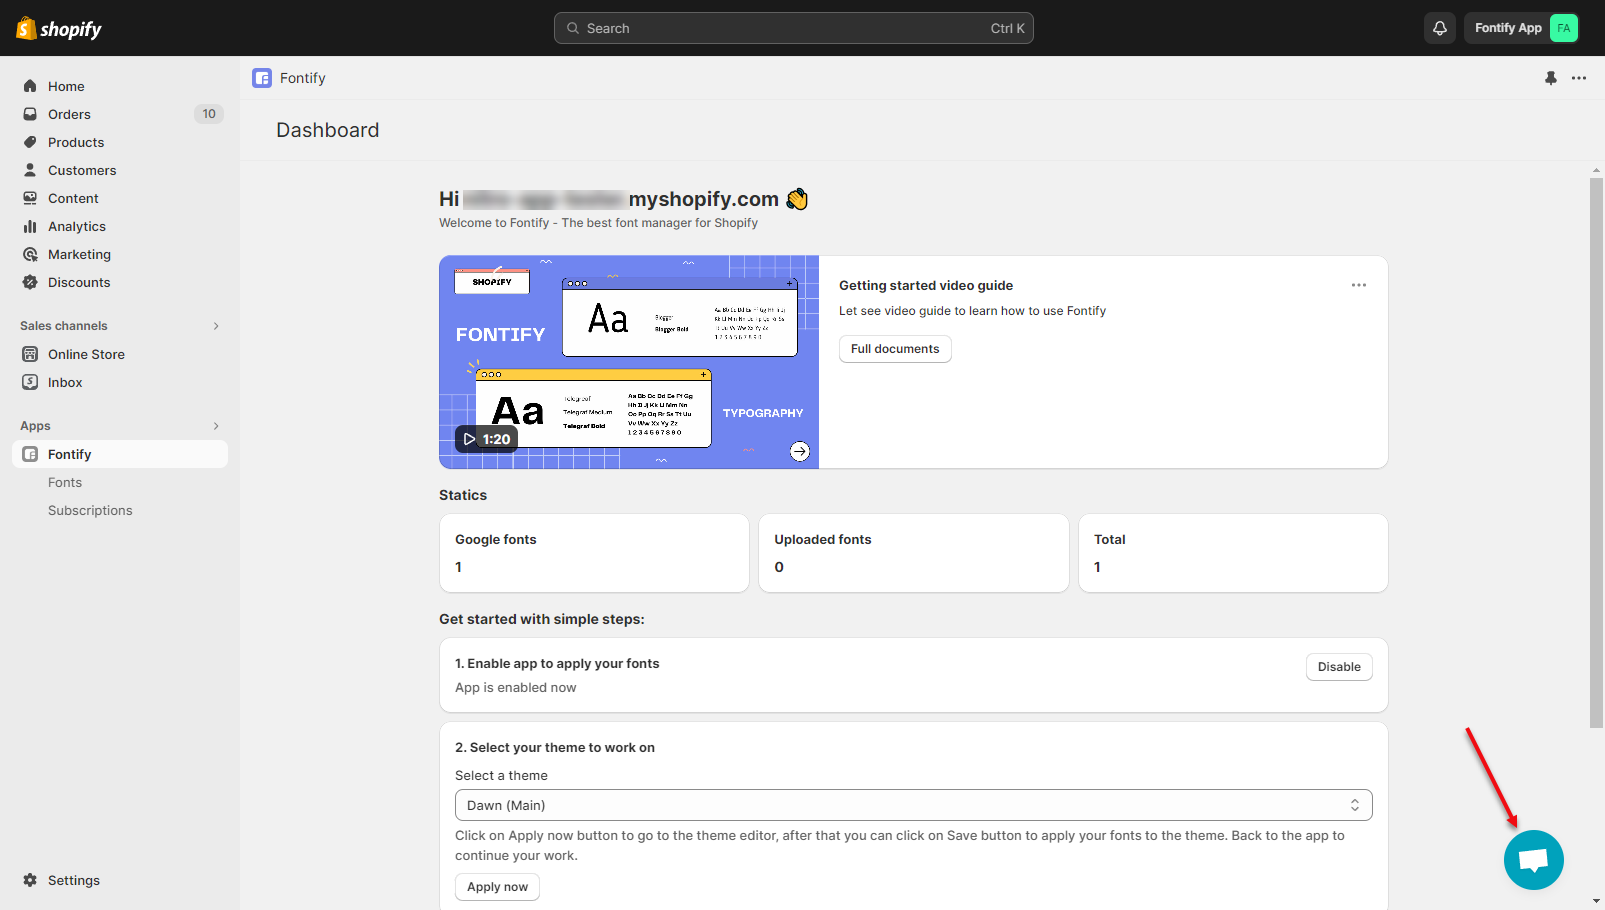
To request assistance from Live Chat, you can simply find the **chatbox icon bubble** at the **bottom right corner** of the Fontify dashboard.

<figure><img src="https://1020453834-files.gitbook.io/~/files/v0/b/gitbook-x-prod.appspot.com/o/spaces%2F-LhdJXbk3sVdej6liHwp%2Fuploads%2FirmF061iHn62mJtwnZ4a%2Fimage.png?alt=media&amp;token=0f58d922-8a63-48b5-bee7-8c6bf77632b5" alt=""><figcaption><p>Click on the chatbox to live chat with Fontify support team</p></figcaption></figure>

Or you can contact us via <support@the4.co> email.


# Introduce

Changing the font for your store has never been easier.

Have you ever wondered how to add a custom font to your Shopify store? If so, this app is for you.

## **Use Any Font For Your Shopify Store**

Do you use a Shopify theme that only supports Google fonts or a theme that doesn’t support any custom fonts at all?... With Fontify, you can use any font - both Google and custom fonts! If you want to use customized fonts, just upload the font file and our app will do everything else.

Our app will import any font you upload and process it to make it work in your store. You only need to choose your font, select the elements that you want to use for it...and you’re done!

## **Why do I need this app?**

If you don't know coding, HTML, CSS, and liquid...but want to have the simple function of using other fonts that your theme does not support, then Fontify is the best solution for you!

## **How does it work?**

You can choose an existing Google font or upload your custom font. After that, just assign to your element (h1, h2, h3, h4, h5, p, custom class...)

## **What will Fontify do for me?**

Fontify will help you use any font without editing any code!

## **Features**

* Easy to install
* Easy to configure
* Use with any font
* Supports all Google fonts
* Compatible with all Shopify themes (also custom themes: Gecko, Basel, Elessi, Molla, and Boutique from The4)
* Well documented
* Live support nearly 24/7
* Use Google Fonts for free

There are 3 features in the App: **Upload font, Store Google Fonts outside Google servers** ($3/month or $29/year), and **Google font** (Free)

Therefore, from now on, whenever you want to modify the Typography, just go to App. You don’t need to do anything in Customize view.


# Get started

After installing the app from Shopify, please follow the below steps to integrate the app into your theme.

**Step 1**: Enable the app to apply your fonts. Open the app and click the **Enable** button to enable the app.

<figure><img src="https://1020453834-files.gitbook.io/~/files/v0/b/gitbook-x-prod.appspot.com/o/spaces%2F-LhdJXbk3sVdej6liHwp%2Fuploads%2FYNSorexywGbZY9j7HSAc%2Fimage.png?alt=media&amp;token=f4e77324-5401-46d9-9fb8-45ed675a8311" alt=""><figcaption></figcaption></figure>

**Step 2: Select the theme** that you want to apply the fonts from the app to and then click on the **Apply Now** button. The app will show all themes that you installed in your store, you can select the published or draft theme.

<figure><img src="https://1020453834-files.gitbook.io/~/files/v0/b/gitbook-x-prod.appspot.com/o/spaces%2F-LhdJXbk3sVdej6liHwp%2Fuploads%2Fe3SyKhsx9IppanA9Rblv%2Fimage.png?alt=media&amp;token=1b22fc41-a9c6-494d-8a5e-b880ee0f8bf0" alt=""><figcaption><p>Select a theme and click Apply now</p></figcaption></figure>

By clicking on the **Apply Now** button, you will be directed to the Theme editor to enable the app embed. Simply click on the **Save** button.

<figure><img src="https://1020453834-files.gitbook.io/~/files/v0/b/gitbook-x-prod.appspot.com/o/spaces%2F-LhdJXbk3sVdej6liHwp%2Fuploads%2FGdeKOMsg62Vs6ONrnXFG%2Fimage.png?alt=media&amp;token=23f796e1-859c-40c8-a9da-7ad8618bfbfc" alt=""><figcaption></figcaption></figure>

{% hint style="info" %}
Note: Please make sure you have done both the above two steps to make the fonts work on your site.
{% endhint %}


# How to change the fonts?

With Fontify you can upload font files or use the fonts from Google Font library.


# Upload font

This feature will allow you to upload the custom fonts to the app and apply them to your site. Please follow the below steps:

**Step 1**: Prepare your custom font file with the format are **ttf / woff / otf.** You can find it at <https://www.fonts.com/>, <https://webfonts.ffonts.net/>, <https://www.dafont.com/>...

**Step 2**: From the **App dashboard**, open the **Fonts** tab and click on the **Create new** button to upload your fonts.

<figure><img src="https://1020453834-files.gitbook.io/~/files/v0/b/gitbook-x-prod.appspot.com/o/spaces%2F-LhdJXbk3sVdej6liHwp%2Fuploads%2FIA5WCcJSyFf6olpZMpsC%2Fimage.png?alt=media&amp;token=af314bb9-c4d3-4a69-a462-51953a23e884" alt=""><figcaption></figcaption></figure>

**Step 3**: Click on **Add file** to select your font file and fill in the **Font name** option.

<figure><img src="https://1020453834-files.gitbook.io/~/files/v0/b/gitbook-x-prod.appspot.com/o/spaces%2F-LhdJXbk3sVdej6liHwp%2Fuploads%2FjtNLRce3BzfWUfRlsBMg%2Fimage.png?alt=media&amp;token=403e82f4-763c-40bf-ad95-63ac52acf730" alt=""><figcaption></figcaption></figure>

**Step 4**: Tick the options that you want to assign the font to. For example, I want to change the font for the **headlines**, so I can tick the **Headline 1 to Headline 6** options.

{% hint style="info" %}
You can tick **“All”**  if you want to make changes to all elements of your store.
{% endhint %}

<figure><img src="https://1020453834-files.gitbook.io/~/files/v0/b/gitbook-x-prod.appspot.com/o/spaces%2F-LhdJXbk3sVdej6liHwp%2Fuploads%2FDb3jJALBRyLEJp66GVio%2Fimage.png?alt=media&amp;token=ef089968-df6f-48b7-a6da-4721ae64cf0a" alt=""><figcaption></figcaption></figure>

{% hint style="info" %}
You can use ***Element Picker*** if you want to make changes to specific parts of your store. Simply click on the **Polaris icon** to select the elements that you want.
{% endhint %}

<figure><img src="https://1020453834-files.gitbook.io/~/files/v0/b/gitbook-x-prod.appspot.com/o/spaces%2F-LhdJXbk3sVdej6liHwp%2Fuploads%2FcVUQrHIgJMA4lpqPeEtl%2Fimage.png?alt=media&amp;token=479e60dd-ed88-4c33-917a-ada5fa53b412" alt=""><figcaption></figcaption></figure>

You will see your store preview. Hover over the text element and click on the **select** text to select whatever elements you want to apply to the new font. After done for the selection, you can see the class name of the elements that you select in the **Custom Elements** box.

<figure><img src="https://1020453834-files.gitbook.io/~/files/v0/b/gitbook-x-prod.appspot.com/o/spaces%2F-LhdJXbk3sVdej6liHwp%2Fuploads%2FGkSDFtyHVDzMa2Mj7SKK%2Fimage.png?alt=media&amp;token=81877e2d-4902-4685-8207-552e49bcf0a5" alt=""><figcaption></figcaption></figure>

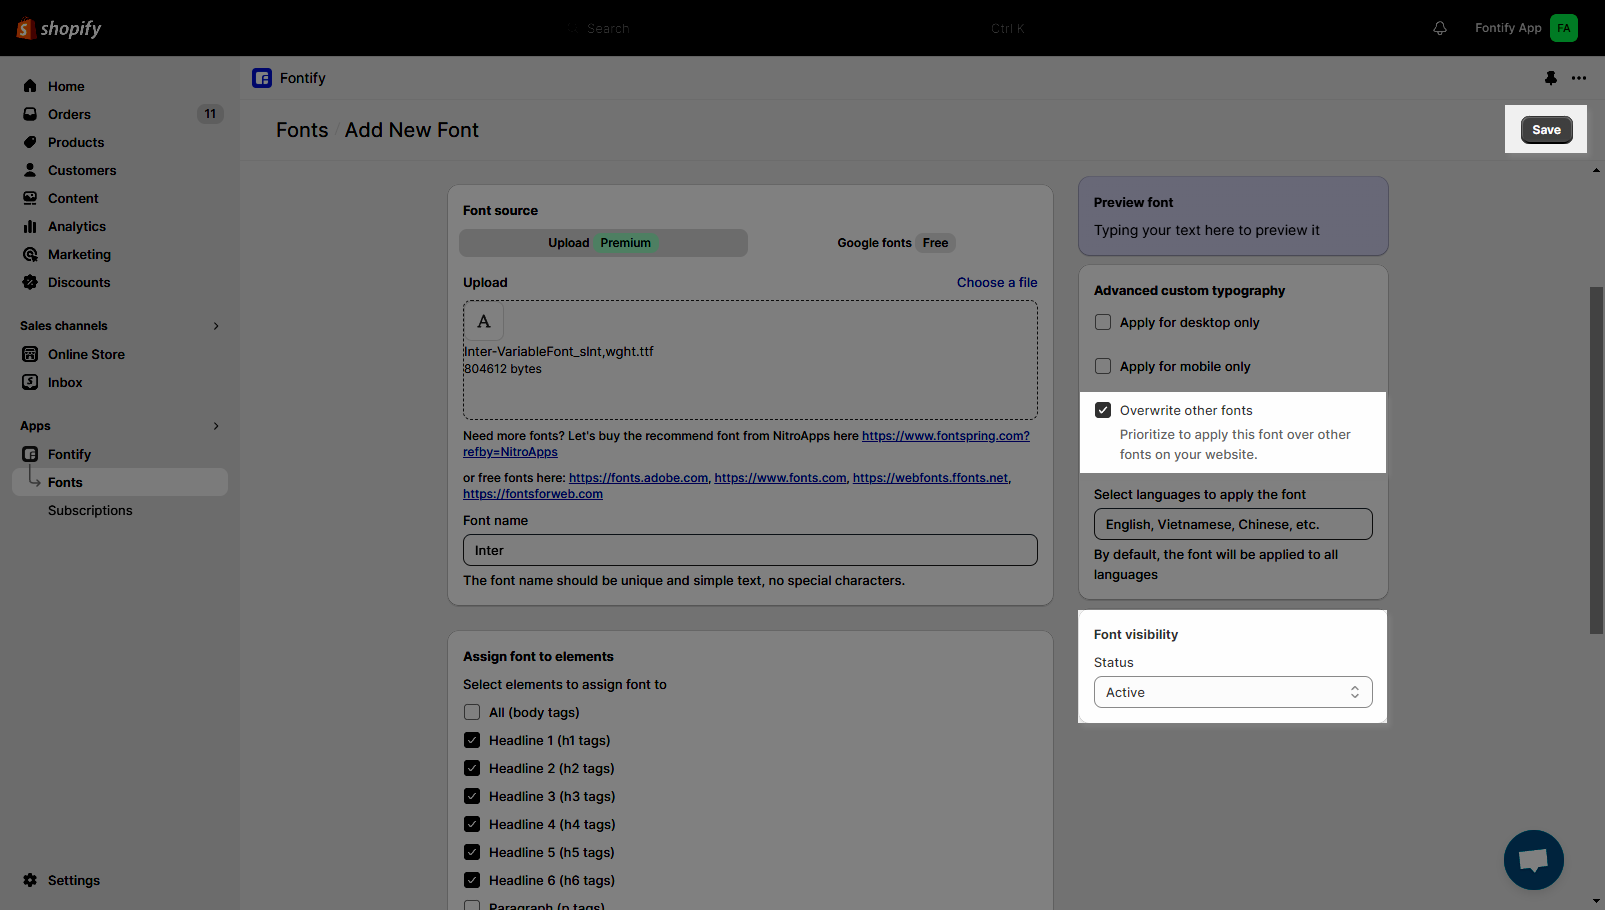
**Step 5**: Tick **Overwrite other fonts** option to overwrite the new font to the font in the Shopify theme. Then click on the **Save** button to upload the new font and apply it to the elements that you selected.

<figure><img src="https://1020453834-files.gitbook.io/~/files/v0/b/gitbook-x-prod.appspot.com/o/spaces%2F-LhdJXbk3sVdej6liHwp%2Fuploads%2Fm09Qx1Hxnu9ThB0Pm46l%2Fimage.png?alt=media&amp;token=cd125aff-ab85-4d44-b61b-d6c9c1fc4d92" alt=""><figcaption></figcaption></figure>

All done, please wait about 1-2 mins and then reload your site to see the result.\
\
Please check the video below for an easier understand.

{% embed url="<https://files.gitbook.com/v0/b/gitbook-x-prod.appspot.com/o/spaces%2F-LhdJXbk3sVdej6liHwp%2Fuploads%2FXovSmu2coYJXvOMHFS46%2FUpload.mp4?alt=media&token=da7ee52c-67a3-418b-8d6b-1d724799eda7>" %}


# Google fonts

With Fontify, you can use **Google fonts** for **free**. You can apply the font to all elements or specific elements :)

&#x20;**Step 1**: From the **App dashboard**, open the **Fonts** tab and click on the **Create a new font** button.

<figure><img src="https://1020453834-files.gitbook.io/~/files/v0/b/gitbook-x-prod.appspot.com/o/spaces%2F-LhdJXbk3sVdej6liHwp%2Fuploads%2FQqHNdIBGpU8togQRclto%2Fimage.png?alt=media&amp;token=58719d29-8bf6-4cc5-88ff-86099e1df24a" alt=""><figcaption></figcaption></figure>

**Step 2**: Open the **Google fonts** tab and click on **Choose font** to select a font.

<figure><img src="https://1020453834-files.gitbook.io/~/files/v0/b/gitbook-x-prod.appspot.com/o/spaces%2F-LhdJXbk3sVdej6liHwp%2Fuploads%2FiAAjWmEaKCazItwQa73n%2Fimage.png?alt=media&amp;token=3822176f-f2e7-4e8d-a931-ae2e3e9d0cf2" alt=""><figcaption></figcaption></figure>

Then find the font that you like and click on the **Sign icon** to select it.

<figure><img src="https://1020453834-files.gitbook.io/~/files/v0/b/gitbook-x-prod.appspot.com/o/spaces%2F-LhdJXbk3sVdej6liHwp%2Fuploads%2FulWL2IAZThCWRCe10bho%2Fimage.png?alt=media&amp;token=0e0ce3f6-e131-40cf-8c2c-2b2fb70b1758" alt=""><figcaption></figcaption></figure>

Please do similar steps with [**Upload font**](https://docs.nitroapps.co/fontify/how-to-change-the-fonts/upload-font). But instead of uploading a font, you can select a font from Google.\
\
You can check out the video below for an easier understanding

{% embed url="<https://files.gitbook.com/v0/b/gitbook-x-prod.appspot.com/o/spaces%2F-LhdJXbk3sVdej6liHwp%2Fuploads%2FQCsXmtD0ScxddgEcmgT2%2FGoogle.mp4?alt=media&token=e1ccf4ca-1dd4-460d-b979-029ea40d310e>" %}


# FAQs

All questions everyone usually ask us


# How to Make Google Fonts GDPR Compliant with Fontify?

To make google fonts GDPR compliant, you can store the fonts on Fontify. There are two ways to store the fonts outside the Google server. To use this feature, you must upgrade to a **Premium** plan. It is $3/month or $29/year.

### 1. Upload the fonts to Fontify

You can open the **Upload** tab and follow [this document](https://docs.nitroapps.co/fontify/how-to-change-the-fonts/upload-font)

But in this way, you must prepare the **font file**. For example, you want to use the Roboto font, which is a Google font but you still need to get the font file and then upload it to Fontify to store it on Fontify's server.

### 2. Use Google fonts but store them outside Google servers

Please refer to [this document](https://docs.nitroapps.co/fontify/how-to-change-the-fonts/google-fonts) to add Google fonts.

With this feature, you do not need to have the font file or no need to upload the font. Simply select font from Google and then tick the **Store Google Fonts outside Google servers** option.


# How to apply a font to all headings on your store?

Usually, we should use two or three fonts on a site. One is for all headings and another one for the body text.&#x20;

To make a font work for all headings, please follow the steps below:

**Step 1**: Click on **Create new** button.

<figure><img src="https://1020453834-files.gitbook.io/~/files/v0/b/gitbook-x-prod.appspot.com/o/spaces%2F-LhdJXbk3sVdej6liHwp%2Fuploads%2F4sTvV53bUxLbDB9IVf19%2Fimage.png?alt=media&amp;token=cfe2eef3-37cf-4494-a803-01acb2b6e4dc" alt=""><figcaption></figcaption></figure>

**Step 2**: Please **upload** your font to Fontify or **select** a Google font. Then enter the **font name.**

<figure><img src="https://1020453834-files.gitbook.io/~/files/v0/b/gitbook-x-prod.appspot.com/o/spaces%2F-LhdJXbk3sVdej6liHwp%2Fuploads%2F4n4CSuob3gKyBF4XkJqE%2Fimage.png?alt=media&amp;token=e29c91c7-d203-4730-9db6-860ebb303e19" alt=""><figcaption></figcaption></figure>

**Step 3:** On the **Assign font to Elements** tab, tick all **Headline** options.

<figure><img src="https://1020453834-files.gitbook.io/~/files/v0/b/gitbook-x-prod.appspot.com/o/spaces%2F-LhdJXbk3sVdej6liHwp%2Fuploads%2FnGaL715PxdmO5PisZyrw%2Fimage.png?alt=media&amp;token=f7e5891c-7b21-4ba4-afa1-b74c4ef8ed45" alt=""><figcaption></figcaption></figure>

**Step 4**: Tick the **Overwrite other fonts** checkbox and click the **Save** button.

<figure><img src="https://1020453834-files.gitbook.io/~/files/v0/b/gitbook-x-prod.appspot.com/o/spaces%2F-LhdJXbk3sVdej6liHwp%2Fuploads%2FyhvQH89bYiRnbUqRRTvt%2Fimage.png?alt=media&amp;token=185b865d-56af-4bc9-9eb1-ac563986cb66" alt=""><figcaption></figcaption></figure>

All done, please wait for about 30 seconds and then reload your live site to check the font.

You can check out the video below for an easier understanding

{% embed url="<https://files.gitbook.com/v0/b/gitbook-x-prod.appspot.com/o/spaces%2F-LhdJXbk3sVdej6liHwp%2Fuploads%2FrDUyemx99ct6sZRykGgF%2FHeading.mp4?alt=media&token=9f361eff-3675-4548-99c1-ca266ed3825a>" %}


# How to apply a font to all body text on your store?

Usually, we should use two or three fonts on a site. One is for all headings and another one for the body text.&#x20;

To make a font work for all mall body text, please follow the steps below:

**Step 1**: Click on the **Create new** button.

<figure><img src="https://1020453834-files.gitbook.io/~/files/v0/b/gitbook-x-prod.appspot.com/o/spaces%2F-LhdJXbk3sVdej6liHwp%2Fuploads%2F4sTvV53bUxLbDB9IVf19%2Fimage.png?alt=media&amp;token=cfe2eef3-37cf-4494-a803-01acb2b6e4dc" alt=""><figcaption></figcaption></figure>

**Step 2**: Please **upload** your font to Fontify or **select** a Google font. Then enter the **font name.**

<figure><img src="https://1020453834-files.gitbook.io/~/files/v0/b/gitbook-x-prod.appspot.com/o/spaces%2F-LhdJXbk3sVdej6liHwp%2Fuploads%2F4n4CSuob3gKyBF4XkJqE%2Fimage.png?alt=media&amp;token=e29c91c7-d203-4730-9db6-860ebb303e19" alt=""><figcaption></figcaption></figure>

**Step 3:** On the **Assign font to Elements** tab, tick on the **Paragraph, Anchor link, and List** options. Also, please fill some tags in the **Custom Elements** box like the below image.

<figure><img src="https://1020453834-files.gitbook.io/~/files/v0/b/gitbook-x-prod.appspot.com/o/spaces%2F-LhdJXbk3sVdej6liHwp%2Fuploads%2F1DlDBPbolOVWoKVkgKqD%2Fimage.png?alt=media&amp;token=08b09c69-2e56-4f0e-9d4f-eaeb31f8cfb6" alt=""><figcaption></figcaption></figure>

You can copy this block code:

```
div
span
input
option
button
```

**Step 4**: Tick the **Overwrite other fonts** checkbox and click the **Save** button.

<figure><img src="https://1020453834-files.gitbook.io/~/files/v0/b/gitbook-x-prod.appspot.com/o/spaces%2F-LhdJXbk3sVdej6liHwp%2Fuploads%2FyhvQH89bYiRnbUqRRTvt%2Fimage.png?alt=media&amp;token=185b865d-56af-4bc9-9eb1-ac563986cb66" alt=""><figcaption></figcaption></figure>

All done, please wait for about 30 seconds and then reload your live site to check the font.

Please check the video below to get an easier understanding.

{% embed url="<https://files.gitbook.com/v0/b/gitbook-x-prod.appspot.com/o/spaces%2F-LhdJXbk3sVdej6liHwp%2Fuploads%2F2BmtwwnBx0LhwUWsrsSe%2FBody.mp4?alt=media&token=9d5b0b29-91d1-47d0-b0ae-53520a4d8f94>" %}


# How to apply a font to some specific parts on your store?

For example, your store is using a Poppins font. You want to keep that font for the whole of the site, just want to change the font for the navigation bar. Fontify can help you do that :)

**Step 1**: Click on the **Create new** button.

<figure><img src="https://1020453834-files.gitbook.io/~/files/v0/b/gitbook-x-prod.appspot.com/o/spaces%2F-LhdJXbk3sVdej6liHwp%2Fuploads%2F4sTvV53bUxLbDB9IVf19%2Fimage.png?alt=media&amp;token=cfe2eef3-37cf-4494-a803-01acb2b6e4dc" alt=""><figcaption></figcaption></figure>

**Step 2**: Please **upload** your font to Fontify or **select** a Google font. Then enter the **font name.**

<figure><img src="https://1020453834-files.gitbook.io/~/files/v0/b/gitbook-x-prod.appspot.com/o/spaces%2F-LhdJXbk3sVdej6liHwp%2Fuploads%2F4n4CSuob3gKyBF4XkJqE%2Fimage.png?alt=media&amp;token=e29c91c7-d203-4730-9db6-860ebb303e19" alt=""><figcaption></figcaption></figure>

**Step 3:** Use the **Picker Element** to select the part that you want in your store.

<figure><img src="https://1020453834-files.gitbook.io/~/files/v0/b/gitbook-x-prod.appspot.com/o/spaces%2F-LhdJXbk3sVdej6liHwp%2Fuploads%2FSZqmKikNENBpPMkerdnq%2Fimage.png?alt=media&amp;token=3d810508-d872-4555-9fca-73feef34e19b" alt=""><figcaption></figcaption></figure>

When clicking on that icon, you will be **redirected** to a new tab with the **Picker element**. You can hover over the text and click on **Select** to pick them.

<figure><img src="https://1020453834-files.gitbook.io/~/files/v0/b/gitbook-x-prod.appspot.com/o/spaces%2F-LhdJXbk3sVdej6liHwp%2Fuploads%2FzDxTITtAOglv5RnqPc2F%2Fimage.png?alt=media&amp;token=99c06db6-5093-4821-a8d0-d8a4c5a65213" alt=""><figcaption></figcaption></figure>

After selecting an element, you can see there is a code added to the **Custom Element** box like this:

<figure><img src="https://1020453834-files.gitbook.io/~/files/v0/b/gitbook-x-prod.appspot.com/o/spaces%2F-LhdJXbk3sVdej6liHwp%2Fuploads%2Fag0anjPngQYBPNEfrRl5%2Fimage.png?alt=media&amp;token=25d5c161-9f74-494b-a7d9-4f413d70af4e" alt=""><figcaption></figcaption></figure>

**Step 4**: Tick the **Overwrite other fonts** checkbox and click the **Save** button.

<figure><img src="https://1020453834-files.gitbook.io/~/files/v0/b/gitbook-x-prod.appspot.com/o/spaces%2F-LhdJXbk3sVdej6liHwp%2Fuploads%2FyhvQH89bYiRnbUqRRTvt%2Fimage.png?alt=media&amp;token=185b865d-56af-4bc9-9eb1-ac563986cb66" alt=""><figcaption></figcaption></figure>

All done, please wait for about 30 seconds and then reload your live site to check the font.

Please check the video below to get an easier understanding

{% embed url="<https://files.gitbook.com/v0/b/gitbook-x-prod.appspot.com/o/spaces%2F-LhdJXbk3sVdej6liHwp%2Fuploads%2FCBgGqdrZ3Vfc9GfE6SYk%2FSpecific.mp4?alt=media&token=1f0d305e-5173-4552-b6d6-6115d814c36c>" %}


# How can I revert my font back to the original?

In case you do not want to use the fonts in Fontify and you want to revert back to the original font of Shopify theme, you can **Disable** the app.&#x20;

On the **App dashboard**, click on **Disable** button.

<figure><img src="https://1020453834-files.gitbook.io/~/files/v0/b/gitbook-x-prod.appspot.com/o/spaces%2F-LhdJXbk3sVdej6liHwp%2Fuploads%2FEDQBYmwCHakF9e4AO57L%2Fimage.png?alt=media&amp;token=36e74197-3280-48a5-b052-5613d91cbb6d" alt=""><figcaption></figcaption></figure>


# Why I can't find the fonts in Theme Customize?

The fonts after being uploaded to Fontify only show in Fontify app, it will not show on Theme customize. Please manage the fonts in Fontify app instead go to Theme customize.


# What should I do when uninstalling the app?

If you uninstall the app, your subscription will be **canceled** and you will have to **charge again** if you reinstall it. So if there are any issues, please contact us via **<support@the4.co>** email or via the live chat to ask for assistance first.

Please consider carefully before deciding to uninstall. If you still want to uninstall it, please follow the below steps:

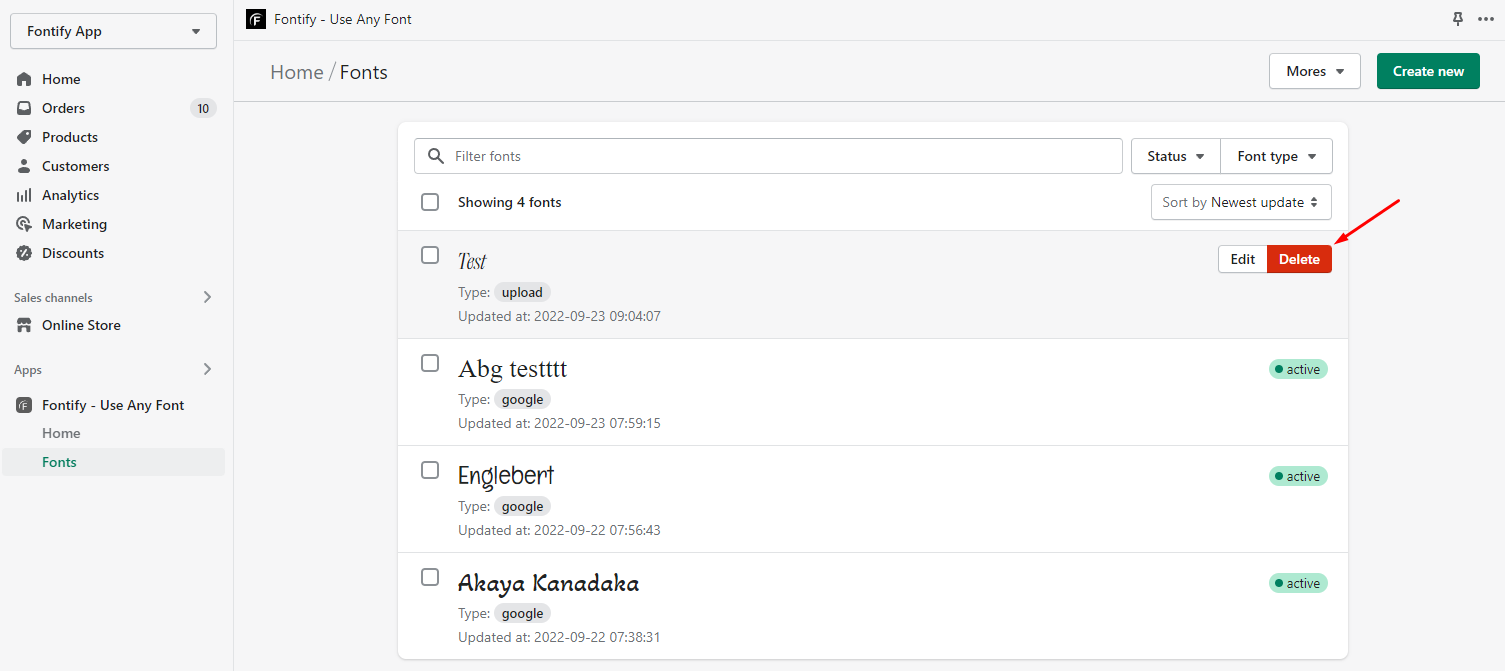
**Step 1:** Delete all fonts in the app. Go to the **App dashboard -> Fonts -> Delete** font.

<figure><img src="https://1020453834-files.gitbook.io/~/files/v0/b/gitbook-x-prod.appspot.com/o/spaces%2F-LhdJXbk3sVdej6liHwp%2Fuploads%2F3nlGOCWUZB0VLFC19U2a%2Fimage.png?alt=media&amp;token=4f5716d4-42ac-4b2a-bb4b-efa0f62e7e62" alt=""><figcaption></figcaption></figure>

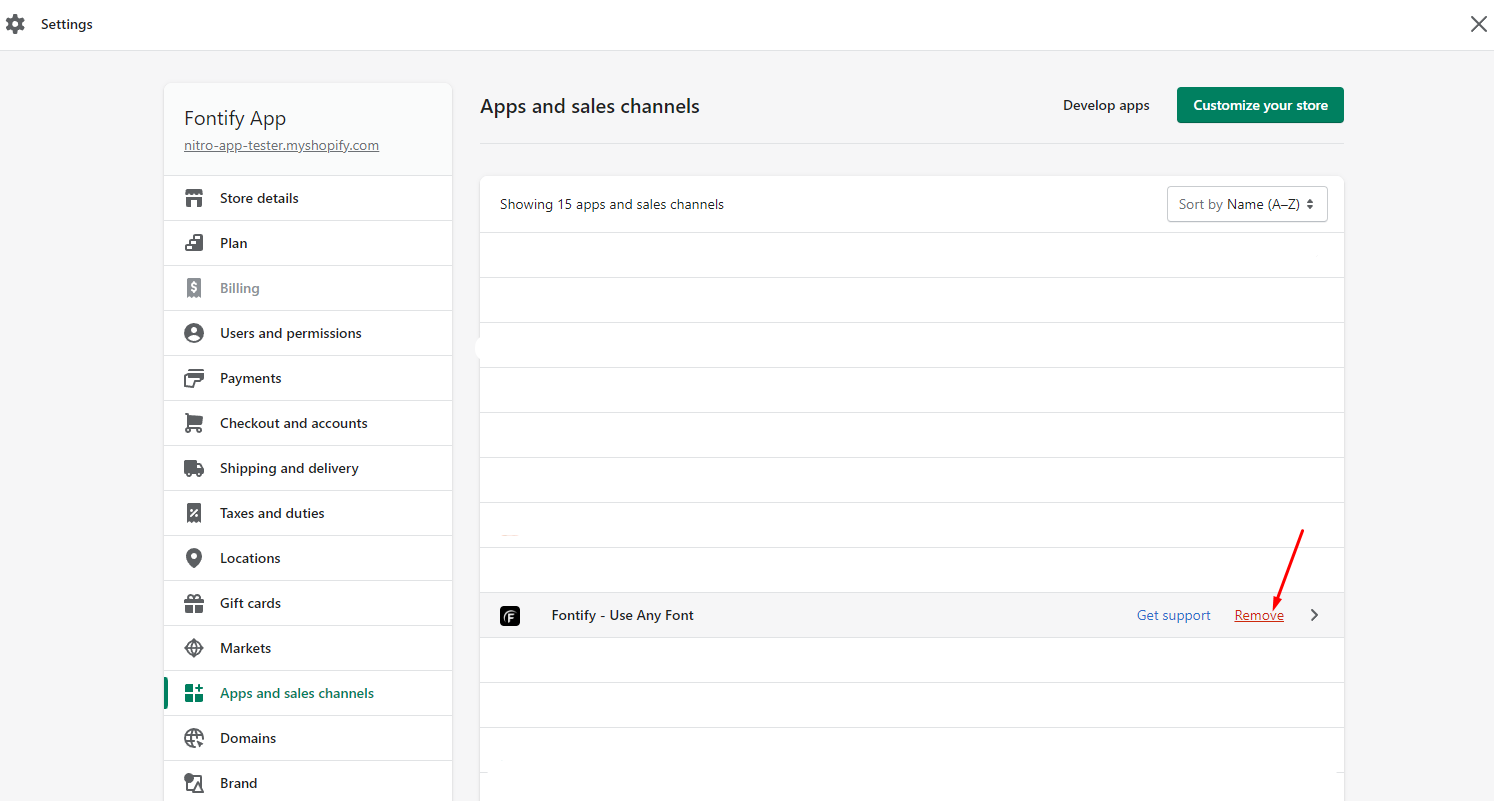
**Step 2:** Go to **Shopify settings -> Apps and sales channels** to **delete** the app from the app list.

<figure><img src="https://1020453834-files.gitbook.io/~/files/v0/b/gitbook-x-prod.appspot.com/o/spaces%2F-LhdJXbk3sVdej6liHwp%2Fuploads%2FfNXAk6CzIOS8w2jED3OT%2Fimage.png?alt=media&amp;token=cbbb9806-5653-46db-94fd-985f714a40db" alt=""><figcaption></figcaption></figure>

**Step 3:** To delete the code of our app completely, you can go to Theme -> Edit code -> find out the file **theme.liquid** –> remove only the below code snippet:

> {{ shop.metafields.fontify.stylesheets }}

You can press CTRL+F on your keyboard to find the "**fontify**" ket word to see the sipper code.

<figure><img src="https://1020453834-files.gitbook.io/~/files/v0/b/gitbook-x-prod.appspot.com/o/spaces%2F-LhdJXbk3sVdej6liHwp%2Fuploads%2FCOm2g0gF9nfJMOP223fc%2Fimage.png?alt=media&amp;token=586f2d86-1e74-4b10-b933-575abeb71ee3" alt=""><figcaption></figcaption></figure>


# \*\*Important Notices before using\*\*

**1.** Don’t let the Design be too big. It’s too slow for loading and rendering in the App. You should choose the size is about 20 cm for the edges of the design area. Or convert it to pixel unit.

<figure><img src="https://wiki.the4.co/wp-content/uploads/2019/11/Screenshot_1.png" alt=""><figcaption></figcaption></figure>

**2.** Don’t upload heavy product image to Product Base. Shopify only allows a maximum of 31MB.

<figure><img src="https://wiki.the4.co/wp-content/uploads/2019/11/Screenshot_30-1.png" alt=""><figcaption></figcaption></figure>

That 39 MB is the maximum size of an order set by Shopify; we can’t change that.

So you need to reduce the size of the uploaded images and reduce the size of the printing area here:

<figure><img src="https://wiki.the4.co/wp-content/uploads/2019/11/Screenshot_16-1.png" alt=""><figcaption></figcaption></figure>

**3.** When you use Lumise, there is no way to get a percentage discount (although a certain amount of discount is still allowed). It is also impossible to use a coupon code. This is a technical limitation problem. We’re so sorry for that.

<figure><img src="https://wiki.the4.co/wp-content/uploads/2019/11/Screenshot_2-1.png" alt=""><figcaption></figcaption></figure>

**4.** You have to prepare your own product images ( mask images) yourself to upload them to the App. You can use Photoshop to lean how to create these product images. Lumise is just a supportive tool.

**5.** To make the other products customizable, you have to go to Lumise Admin > Ad New Products Base. Our app does not use the **existing Shopify products** in your store. You need to create them once again in the app here.

<figure><img src="https://wiki.the4.co/wp-content/uploads/2019/11/Screenshot_14.png" alt=""><figcaption></figcaption></figure>


# Demo

Click [**here**](https://demo.lumise.com/) to view Demo store

<figure><img src="https://wiki.the4.co/wp-content/uploads/2019/09/Screenshot_31-4.png" alt=""><figcaption></figcaption></figure>


# Installations

### 1. Embed customize button <a href="#span-stylecolor-0033661-embed-customize-buttonspan" id="span-stylecolor-0033661-embed-customize-buttonspan"></a>

Just some easy steps to make it works! If it’s too difficult for you to do, **feel free to contact us via Live chat support we will help you install the App for free and as soon as possible.**

**Step 1.** Go to **Theme –> Actions -> Edit code**

**Step 2.** Open – `templates/Product.liquid` or `sections/product-template.liquid`

**Step 3.** Find **Add to cart button**. You can use Ctrl+F to find it (keyword “**cart**“)<br>

<figure><img src="https://cdn.shopify.com/s/files/1/0121/5945/1236/files/Screenshot_at_Mar_06_17-00-06.png?13822997068911432409" alt=""><figcaption></figcaption></figure>

**Step 4.** Copy this Snippet code:

```liquid
{%- capture cart_button -%}
<!-- Paste your cart button to this block -->

<!-- / End -->
    {%- endcapture -%}
      {%- if product.tags contains 'lumise'-%}
        {%- if product.tags contains 'lumise-product-base' and product.metafields.lumise and  product.metafields.lumise.product_base %}
            <a class="lumise-button-customize btn button" href="{{shopify.domain}}/apps/design-editor/app/?product_cms={{product.id}}&amp;product_base={{product.metafields.lumise.product_base.value}}" type="button">Customize</a>
        {%- elsif product.tags contains 'lumise-customize' and product.metafields.lumise and  product.metafields.lumise.product_base  and product.metafields.lumise.product and product.metafields.lumise.product.value contains 'id:'-%}
            {%- assign lumise_options =  product.metafields.lumise.product.value | split: '|' -%}
            {%- for opt in lumise_options -%}
                {%- assign field = opt | split: ':'-%}
                {%- if field[0] == 'lumise_disable_add_cart' and field[1] != 'yes'-%}
                    {{-cart_button-}}
                {%- endif-%}
                {%- if field[0] == 'lumise_customize' and field[1] == 'yes' -%}
                    <a class="lumise-button-customize btn button" href="{{shopify.domain}}/apps/design-editor/app/?product_cms={{product.id}}&amp;product_base={{product.metafields.lumise.product_base.value}}" type="button">Customize</a>
                {% endif%}
            {%- endfor-%}
        {%- else -%}
            {{-cart_button-}}
        {%- endif-%}
      {%- else %}
            {{-cart_button-}}
    {%- endif -%}
```

**Step 5.** Then **paste it below** the block code of the button “Add to cart”

<figure><img src="https://cdn.shopify.com/s/files/1/0121/5945/1236/files/Screenshot_at_Mar_06_19-03-47.png?6097022809019377933" alt=""><figcaption></figcaption></figure>

### 2. Modify the Order status page <a href="#span-stylecolor-0033662-modify-the-order-status-pagespan" id="span-stylecolor-0033662-modify-the-order-status-pagespan"></a>

\*Display a thumbnail of the design when the order completed

**Step 1.** Go to **Admin store -> Settings -> Checkout**

**Step 2.** Copy the snippet code below

```liquid
{% if order.tags contains 'lumise'%}
<style>
.product-table tr[data-product-id=""] {
display: none
}
.lumise-list-items{
margin-top: 20px;
}
.lumise-list-items tr:not(:last-child) {
border-bottom: 1px solid #d8d8d87d
}
.lumise-list-items td.order-list__item__cell {
    padding-top: 10px !important;
    padding-bottom: 10px !important;
}
.lumise-list-items .product-thumbnail::after {
    border: none;
}
.lumise-list-items p.order-list__item-price {
    min-width: 50px;
}
.lumise-list-items td.order-list__product-description-cell {
    text-align: left;
}
</style>
<div class="lumise-list-items ">
<h2 class="section__title">List your customized products</h2>
<table class="row" style="margin-top:10px">
    {% for line in order.line_items %}
    {% if line.product_id != blank %}{% continue%} {% endif%}
    <tr class="order-list__item">
        <td class="order-list__item__cell">
            <table>
        <td class="product-thumbnail">
            {%- if line.image -%}
                <img src="{{ line | img_url: 'compact_cropped' }}" align="left" width="60" height="60" class="order-list__product-image" />
            {%- elsif line.properties != empty -%}
                {% for property in line.properties %}
                    {%- if property.first == "_Preview" -%}
                        <img src="{{ property.last }}" align="left" width="60" height="60" class="order-list__product-image" />
                        {%- break-%}
                    {%- endif -%}
                {%- endfor-%}
            {%- endif -%}
        </td>
        <td class="order-list__product-description-cell">
            {% if line.product.title %}
                {% assign line_title = line.product.title %}
            {% else %}
                  {% assign line_title = line.title %}
            {% endif %}
            {% if line.quantity < line.quantity %} {% capture line_display %} {{ line.quantity }} of {{ line.quantity }} {% endcapture %} {% else %} {% assign line_display=line.quantity %} {% endif %} <span class="order-list__item-title">{{ line_title }} × {{ line_display }}</span>
                {% if line.variant.title != 'Default Title' %}
                <br />
                <span class="order-list__item-variant">{{ line.variant.title }}</span>
                {% endif %}
                {% if line.refunded_quantity > 0 %}
                <br />
                <span class="order-list__item-refunded">Refunded</span>
                {% endif %}
                {% if line.discount_allocations %}
                {% for discount_allocation in line.discount_allocations %}
                  {% if discount_allocation.discount_application.target_selection != 'all' %}
                    <span class="order-list__item-discount-allocation">
                        <img src="{{ 'notifications/discounttag.png' | shopify_asset_url }}" width="18" height="18" class="discount-tag-icon" />
                        <span>
                            {{ discount_allocation.discount_application.title | upcase }}
                            (-{{ discount_allocation.amount | money }})
                        </span>
                    </span>
                  {% endif %}
                {% endfor %}
            {% endif %}
        </td>
        <td class="order-list__price-cell">
            {% if line.original_line_price != line.final_line_price %}
            <del class="order-list__item-original-price">{{ line.original_line_price | money }}</del>
            {% endif %}
            <p class="order-list__item-price">
                {% if line.final_line_price > 0 %}
                {{ line.final_line_price | money }}
                {% else %}
                Free
                {% endif %}
            </p>
        </td>
</table>
</td>
</tr>{% endfor %}
</table>
</div>
{% endif%}
```

**Step 3.** Paste it to `Additional scripts` like this:

<figure><img src="https://cdn.shopify.com/s/files/1/0121/5945/1236/files/Screenshot_at_Mar_06_17-05-49.png?14235440889459585386" alt=""><figcaption></figcaption></figure>

### 3. Customize order email confirm <a href="#span-stylecolor-0033663-customize-order-email-confirmspan" id="span-stylecolor-0033663-customize-order-email-confirmspan"></a>

\
When an order is created, an email will be sent to your customer, so you need to modify it to display the thumbnail design

**Step 1.** Go to **Admin -> Settings -> Notifications -> Order Confirmation**

**Step 2.** Copy this block code:

```liquid
 {%- if line.image -%}
    <img src="{{ line | img_url: 'compact_cropped' }}" align="left" width="60" height="60" class="order-list__product-image"/>
    {%- elsif line.properties != empty -%}
    {% for property in line.properties %}
        {%- if property.first == "_Preview" -%}
            <img src="{{ property.last }}" align="left" width="60" height="60" class="order-list__product-image"/>
            {%- break-%}
        {%- endif -%}
    {%- endfor-%}
{%- endif -%}

```

**Step 3.** Replace the below code blocks with the snippet you have just copied.

* With **Shopify OS 1.0** themes, you can use Ctrl+F to find it (the keyword is “image”)

<figure><img src="https://cdn.shopify.com/s/files/1/0121/5945/1236/files/Screenshot_at_Mar_06_18-41-12.png?9533437877464086883" alt=""><figcaption></figcaption></figure>

* With the **Shopify OS 2.0** themes, please find the keyword “**shop.email\_logo\_url**“

<figure><img src="https://wiki.the4.co/wp-content/uploads/2019/09/image-2048x947.png" alt=""><figcaption></figcaption></figure>

After installation is done, Lumise will create 2 ends for you. One is for customers to design a product Another one is for the store owner to configure settings on the customer’s end.

Similar steps with **| Order refund | Order canceled | Abandoned checkout | Draft order invoice | Shipping confirmation | New order**

**\*Note:** for New order Replace \<img src=”{{ line | img\_url: ‘thumb’ }}” /> by the code above.

### 4. Add the CSS code to Lumise settings <a href="#span-stylecolor-0033664-add-the-css-code-to-lumise-settingsspan" id="span-stylecolor-0033664-add-the-css-code-to-lumise-settingsspan"></a>

**Step 1.** Go to **Lumise app -> Settings -> Editor -> Custom CSS box**.

**Step 2.** Copy the below code and paste it to the Custom CSS box.

```css
#lumise-stage-nav [data-tip="true"] span {
opacity: 1;
bottom: 80%;
z-index: 10;
transition: all 300ms ease 150ms;
visibility: visible;
display: block !important;
}
ul.lumise-list-items li {
background-size: contain !important;
background-repeat: no-repeat;
}
```

Like this:

<figure><img src="https://wiki.the4.co/wp-content/uploads/2019/09/setting1-2048x956.png" alt=""><figcaption></figcaption></figure>

### 5. Create a new Product base to see how the app work. <a href="#span-stylecolor-0033665-create-a-new-product-base-to-see-how-the-app-workspan" id="span-stylecolor-0033665-create-a-new-product-base-to-see-how-the-app-workspan"></a>

**Step 1.** Go to **Lumise app -> Product Base -> Add new product base.**

<figure><img src="https://wiki.the4.co/wp-content/uploads/2019/09/add-product-2048x958.png" alt=""><figcaption></figcaption></figure>

**Step 2.** Enter your product information.

**Step 3.** After creating a product base, it will appear in your Shopify as a new product with the tag **Lumise base**. Please don’t remove that tag, your product must have that tag to work with Lumise. Go to **Shopify -> Products -> find that product to preview it.**

<figure><img src="https://wiki.the4.co/wp-content/uploads/2019/09/product-2048x947.png" alt=""><figcaption></figcaption></figure>

{% hint style="info" %}
It is likely that the app **may not work** on **third-party themes**, if this is the case please **contact** us for free **support**.
{% endhint %}

<figure><img src="https://wiki.the4.co/wp-content/uploads/2019/09/support-2048x954.png" alt=""><figcaption></figcaption></figure>

Let us know if there’s anything else we can do for you. We’re happy to help you :relaxed:&#x20;


# Product Base

### How to start by moving a Product into the Design Editor <a href="#span-stylecolor-003366how-to-start-by-moving-a-product-into-the-design-editorspan" id="span-stylecolor-003366how-to-start-by-moving-a-product-into-the-design-editorspan"></a>

You can follow this tutorial video below:

{% embed url="<https://youtu.be/5VLjEdF0VEQ>" %}

#### Or these screenshots guide <a href="#span-stylecolor-003366or-these-screenshots-guidespan" id="span-stylecolor-003366or-these-screenshots-guidespan"></a>

Step 1: Go to **Lumise Control Panel** [http://app.lumise.com](https://app.lumise.com/) Then create a **Product Base**

<figure><img src="https://cdn.shopify.com/s/files/1/0021/5613/4482/files/download.png?4029" alt=""><figcaption></figcaption></figure>

**Step 2:** Fill in **detail** of Product Base

<figure><img src="https://cdn.shopify.com/s/files/1/0021/5613/4482/files/Screenshot_1.png?4030" alt=""><figcaption></figcaption></figure>

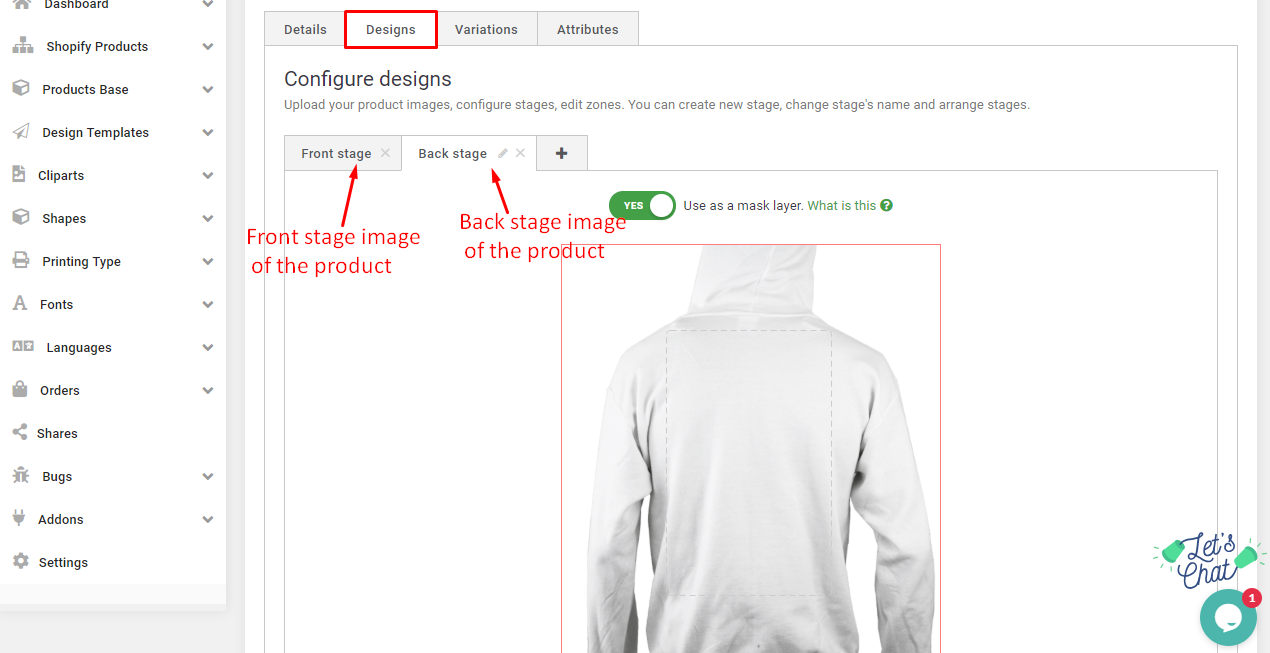
**Step 3:** In **Design tab ->** Create **stages** for product

<figure><img src="https://cdn.shopify.com/s/files/1/0021/5613/4482/files/Screenshot_2.png?4031" alt=""><figcaption></figcaption></figure>

Customize **Design area**

<figure><img src="https://cdn.shopify.com/s/files/1/0021/5613/4482/files/Screenshot_3.png?4032" alt=""><figcaption></figcaption></figure>

Select product base images in **Lumise samples**. Lumise Sample are mask images\
Read more about [**Mask image**](https://app.lumise.com/docs/1.0/mask-image)

<figure><img src="https://cdn.shopify.com/s/files/1/0021/5613/4482/files/Screenshot_4.png?4033" alt=""><figcaption></figcaption></figure>

{% hint style="info" %}
**Note:** By selecting a **Lumise Sample**, you can change the orginal color of product base image to **any colors** which you want. But with an Upload image you **can not** do it.
{% endhint %}

<figure><img src="https://cdn.shopify.com/s/files/1/0021/5613/4482/files/Screenshot_5.png?4035" alt=""><figcaption></figcaption></figure>

**Step 4:** Skip **Variant tab** and go to **Attribute tab**

<figure><img src="https://cdn.shopify.com/s/files/1/0021/5613/4482/files/Screenshot_6.png?4035" alt=""><figcaption></figcaption></figure>

* Attribute type 1: **Product color**&#x20;

<figure><img src="https://cdn.shopify.com/s/files/1/0021/5613/4482/files/Screenshot_7.png?4042" alt=""><figcaption></figcaption></figure>

<figure><img src="https://cdn.shopify.com/s/files/1/0021/5613/4482/files/Screenshot_9.png?4042" alt=""><figcaption></figcaption></figure>

* Attribute type 2: **Dropdown**&#x20;

<figure><img src="https://cdn.shopify.com/s/files/1/0021/5613/4482/files/Screenshot_10.png?4042" alt=""><figcaption></figcaption></figure>

* Attribute type 3: **Textarea**&#x20;

<figure><img src="https://cdn.shopify.com/s/files/1/0021/5613/4482/files/Screenshot_11.png?4042" alt=""><figcaption></figcaption></figure>

**Step 5:** Go back to **Variant Tab ->** Add **new variant** based on Atttributes: **Product color and Dropdown**

<figure><img src="https://cdn.shopify.com/s/files/1/0021/5613/4482/files/Screenshot_12.png?4042" alt=""><figcaption></figcaption></figure>

Fill in Variant information such as: **price, min+max quantity, description**

<figure><img src="https://cdn.shopify.com/s/files/1/0021/5613/4482/files/Screenshot_13.png?4042" alt=""><figcaption></figcaption></figure>

\===> Click to “Save Product”\
**Please go here to check what you have set for this “Product base 1”**

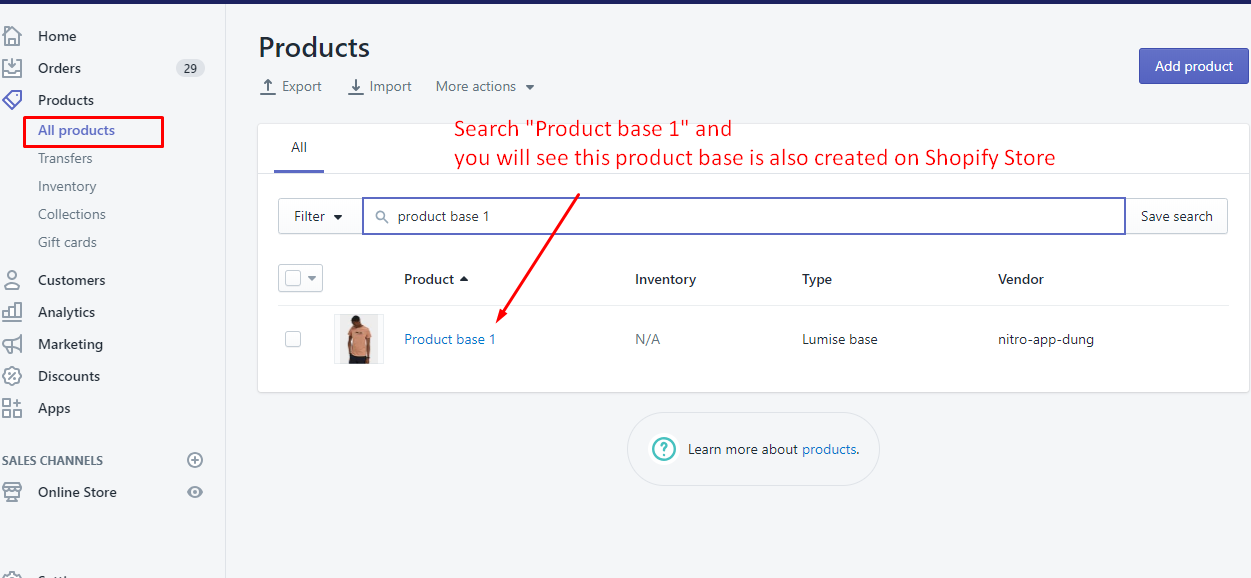
**Step 6.** Go to **Shopify Admin> All Products.** The product base you’ve created is showing up as a **Shopify product** in your store

<figure><img src="https://cdn.shopify.com/s/files/1/0021/5613/4482/files/Screenshot_14.png?4045" alt=""><figcaption></figcaption></figure>

**Step 7.** Go to View this Shopify product in its **product page**. Find **Customize** button. If you can not find out the Customize button, please do embded code again. Or contact us to get help

<figure><img src="https://cdn.shopify.com/s/files/1/0021/5613/4482/files/Screenshot_15.png?4045" alt=""><figcaption></figcaption></figure>

{% hint style="info" %}
Note: The **Customize button** is automatically created, so it may not in suitable style. If this is a case, please contact us for a support. We’ll help you change the style of this button for free
{% endhint %}

Here is how it looked on the **Customer end.**<br>

<figure><img src="https://cdn.shopify.com/s/files/1/0021/5613/4482/files/Screenshot_16.png?4045" alt=""><figcaption></figcaption></figure>

### 2. On Customer end <a href="#span-stylecolor-003366br-2-on-customer-endspan" id="span-stylecolor-003366br-2-on-customer-endspan"></a>

Let’s check the **settings** you have done for this product base in Lumise Control Panel before

<figure><img src="https://cdn.shopify.com/s/files/1/0021/5613/4482/files/Screenshot_17.png?4047" alt=""><figcaption></figcaption></figure>

{% hint style="info" %}
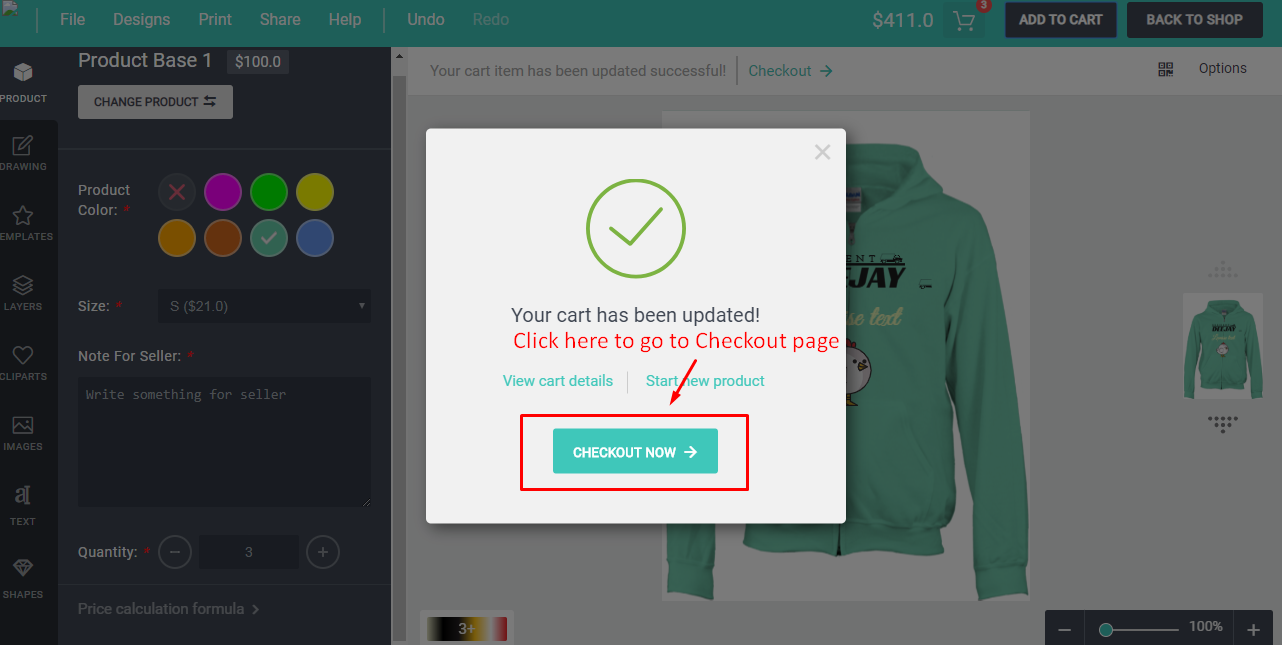
**Note:** When customer added designed products to cart .Then exit Design page, go back to shop because they don’t want to Checkout thereafter. They can review their products anytime by clicking on the **fixed cart** icon, This cart icon appear on HOME page of your store
{% endhint %}

<figure><img src="https://cdn.shopify.com/s/files/1/0021/5613/4482/files/Screenshot_25_60eaebe5-9d0a-4b81-9833-72ee0b10a6cf.png?4447" alt=""><figcaption></figcaption></figure>

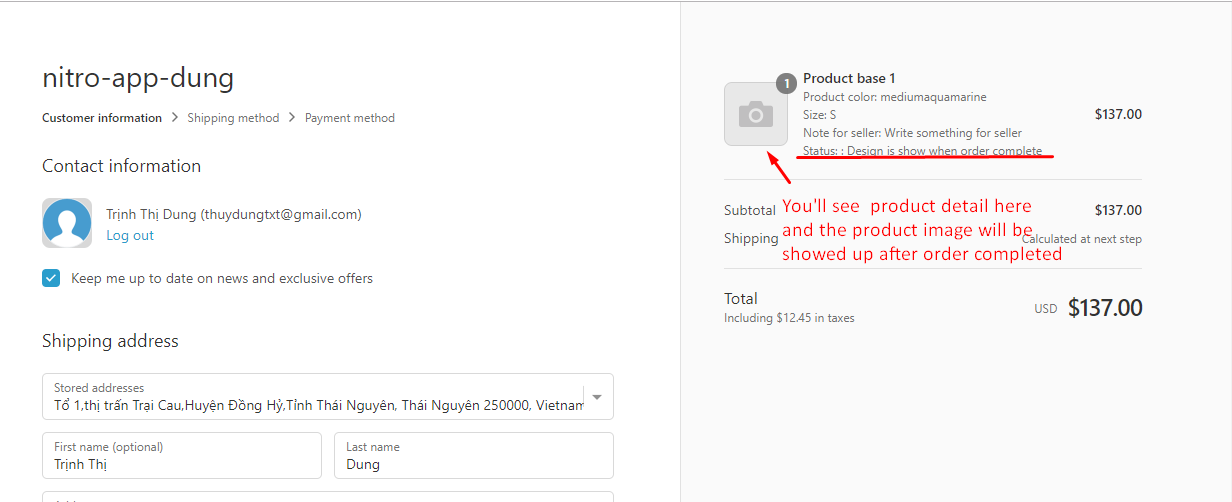
**Checkout**

<figure><img src="https://cdn.shopify.com/s/files/1/0021/5613/4482/files/Screenshot_21.png?4052" alt=""><figcaption></figcaption></figure>

Designed product information

<figure><img src="https://cdn.shopify.com/s/files/1/0021/5613/4482/files/Screenshot_22.png?4052" alt=""><figcaption></figcaption></figure>

The customer’s order with a product designed by themselves is **completed**!

<figure><img src="https://cdn.shopify.com/s/files/1/0021/5613/4482/files/Screenshot_23.png?4052" alt=""><figcaption></figcaption></figure>

### **Download Customer’s Design**

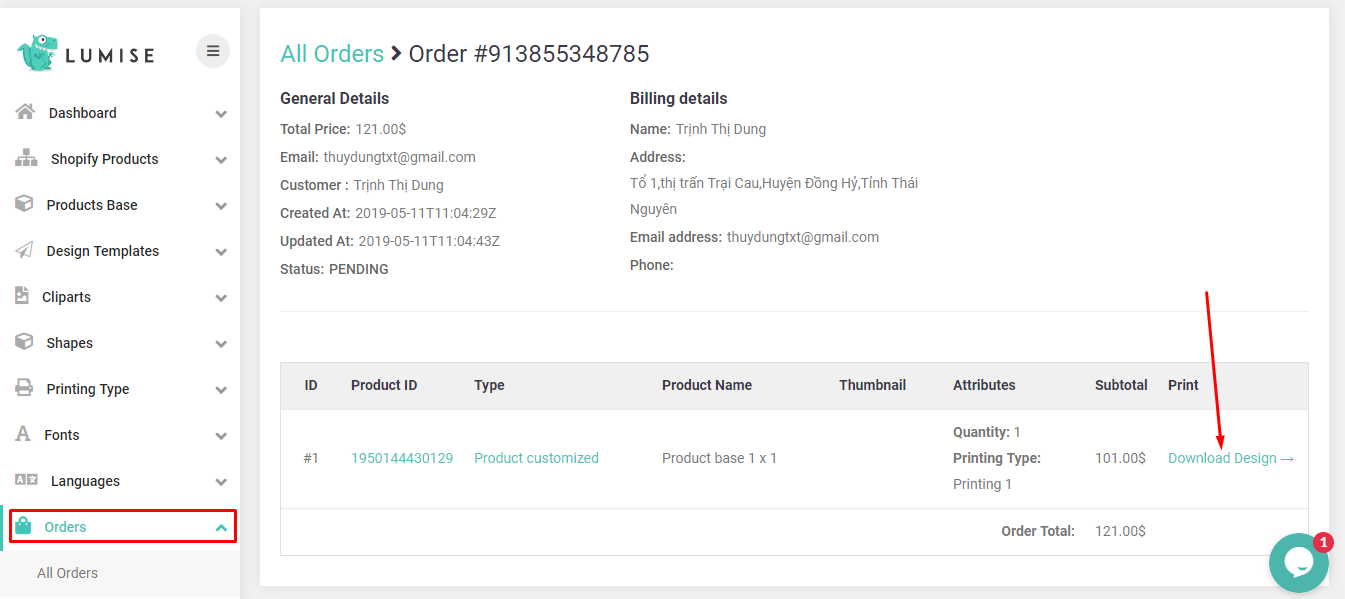
After your customer had completed checkout process, You can go to **Orders** –> Select an order–> Click to Download design

<figure><img src="https://cdn.shopify.com/s/files/1/0016/3866/2201/files/Screenshot_41.png?5387" alt=""><figcaption></figcaption></figure>


# FAQs


# Shopify Products

**Shopify Product** help you:\
-Create a product on your Shopify store\
-Directly adding a template on it at **Control Panel**

**Step 1:** Go to **Control Panel> Shopify Product > Add new product**

**Step 2:** In **Detail tab**, fill in the product details, these details is also showed up on **Shopify side**

<figure><img src="https://cdn.shopify.com/s/files/1/0021/5613/4482/files/Screenshot_16_94ae5aac-f93f-4ec2-a31e-36bb3e618378.png?11079" alt=""><figcaption></figcaption></figure>

**Step 3:** In **Design tab.** Select a **Product Base**

<figure><img src="https://cdn.shopify.com/s/files/1/0021/5613/4482/files/Screenshot_17_545e4ec8-96ff-4641-9be4-09b51f17928d.png?11079" alt=""><figcaption></figcaption></figure>

You can **Edit or Add new** this product base as well

<figure><img src="https://cdn.shopify.com/s/files/1/0021/5613/4482/files/Screenshot_22_f9cb9b11-eb28-49a2-b5a7-e9ddd427f8f3.png?14155" alt=""><figcaption></figcaption></figure>

You can select the Product base you’ve created or create a new one

<figure><img src="https://cdn.shopify.com/s/files/1/0021/5613/4482/files/Screenshot_18_642049c4-31eb-4375-9e2c-c69247569eb4.png?11079" alt=""><figcaption></figcaption></figure>

**Step 4:** Select a **template** to design for this Shopify product

<figure><img src="https://cdn.shopify.com/s/files/1/0021/5613/4482/files/Screenshot_19_ff245a04-34cf-463e-82c2-84ddfe90c303.png?11079" alt=""><figcaption></figcaption></figure>

**Align the template**

<figure><img src="https://cdn.shopify.com/s/files/1/0021/5613/4482/files/Screenshot_20_5bac46df-2a9d-4c7a-91e6-689efa4ad22f.png?11079" alt=""><figcaption></figcaption></figure>

And **hit Save**\
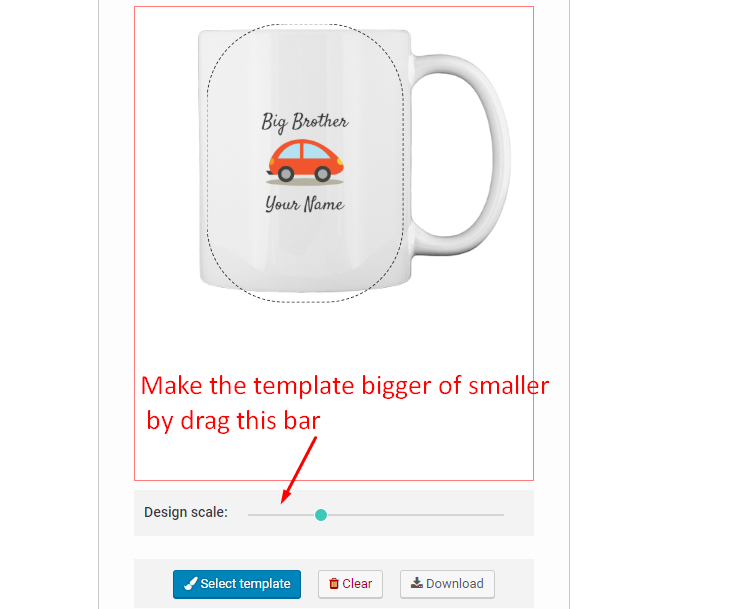
You also can **download** your design then replace the image in Detail tab by this image

<figure><img src="https://cdn.shopify.com/s/files/1/0021/5613/4482/files/Screenshot_21_1f3cae86-3d97-4102-b695-780e767b595a.png?11079" alt=""><figcaption></figcaption></figure>

After creating this Product Base, when your customer click to customize this product, they will see this design with template **at first**.\
If they like your design, they can add it to cart then\
If they don’t like it, they can still make their own design like normal.


# Design Template

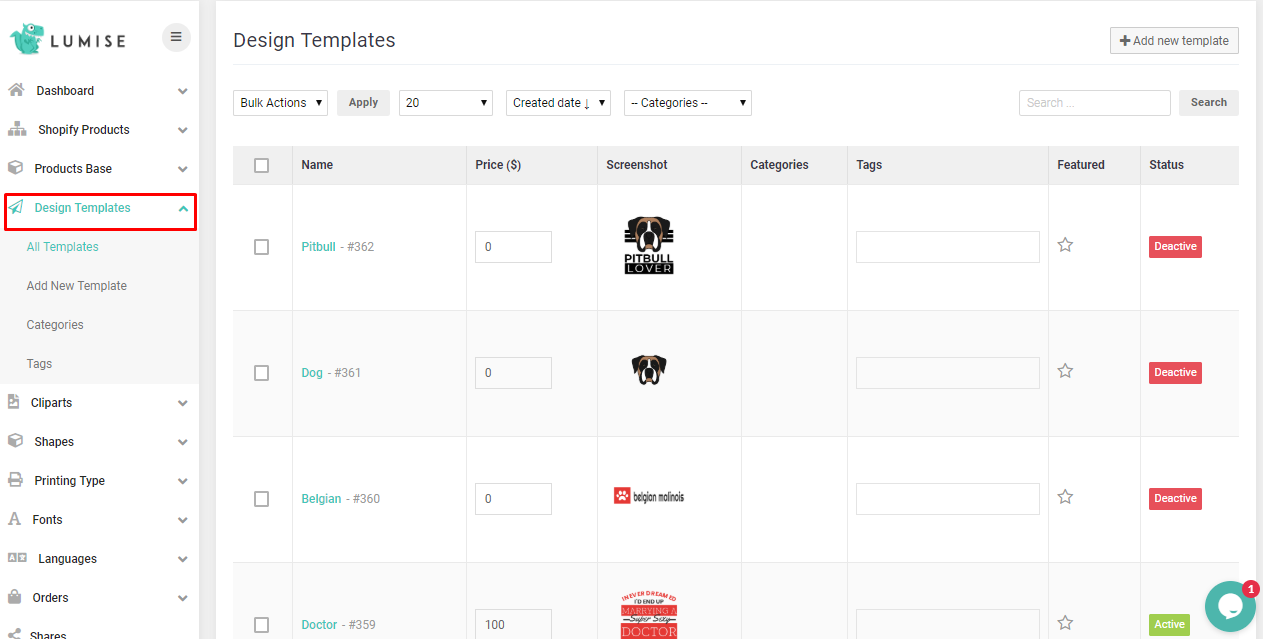
**Design templates** are a list of the template which you prepare for users to select on their end They can add them to a product with one click.

To manage Templates, just go to **Admin panel > Templates**. In this page, you can see the **thumbnail of templates, name, categories and some filter options** on the top as well.

<figure><img src="https://cdn.shopify.com/s/files/1/0021/5613/4482/files/Screenshot_24.png?4059" alt=""><figcaption></figcaption></figure>

By default, it will show all items here. You can refine the list to show only specific templates by using the drop-down menus above the items list. The list auto refresh after you make a selection.

* **Bulk Actions:** You can also act on multiple items at once. Select the items you want to act on using the checkboxes> select an action> click **Apply**
* **Number of item per page**
* **Sort by**
* **Categories**

<figure><img src="https://cdn.shopify.com/s/files/1/0021/5613/4482/files/up.png?4066" alt=""><figcaption></figcaption></figure>

**Set price for a Template**

<figure><img src="https://cdn.shopify.com/s/files/1/0021/5613/4482/files/Screenshot_25.png?4064" alt=""><figcaption></figcaption></figure>

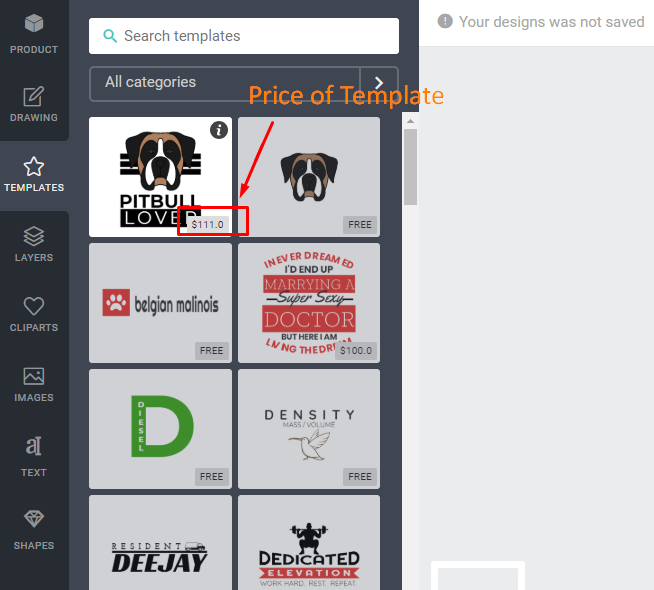
When you set a price for Template, It will show up on **Customer end.**

<figure><img src="https://cdn.shopify.com/s/files/1/0021/5613/4482/files/Screenshot_26.png?4064" alt=""><figcaption></figcaption></figure>

It’s also **counted** to price of the product

<figure><img src="https://cdn.shopify.com/s/files/1/0021/5613/4482/files/Screenshot_27.png?4064" alt=""><figcaption></figcaption></figure>

**Adding New Template**

<figure><img src="https://cdn.shopify.com/s/files/1/0021/5613/4482/files/Screenshot_28.png?4065" alt=""><figcaption></figcaption></figure>

<br>

<br>


# Sample File Download

You can download our demo Templates and Cliparts here:\
<https://drive.google.com/file/d/1tka9LbWaXGKdXky_Wgl69LXzkisTVmdJ/view>

Then you unzip it –> go to Lumise Admin -> Upload the files.

For more high-quality graphics, please contact us via Live chat or email: <support@the4.co>

Thanks.


# Printing Type

## Adding New Printing Type

You have so many products or templates or cliparts and it’s hard for you to find one of them. Categories will help you sort out them.

**Step 1**. Go to **Templates> Categories> Add new categories**

<figure><img src="https://cdn.shopify.com/s/files/1/0021/5613/4482/files/Screenshot_0.png?4479" alt=""><figcaption></figcaption></figure>

**Step 2**. Fill in its detail

<figure><img src="https://cdn.shopify.com/s/files/1/0021/5613/4482/files/Screenshot_1_ddb8b447-d142-4dce-b15a-b282f5f696e4.png?4479" alt=""><figcaption></figcaption></figure>

**Step 3**. Go to Add/Edit a template

<figure><img src="https://cdn.shopify.com/s/files/1/0021/5613/4482/files/Screenshot_2_f64a226a-34ed-4f14-9a23-3cdf6bd861dd.png?4479" alt=""><figcaption></figcaption></figure>

**Step 4** Find it on **Customer end**

<figure><img src="https://cdn.shopify.com/s/files/1/0021/5613/4482/files/Screenshot_3_3640caef-5970-443a-8c38-77f791fa82ee.png?4479" alt=""><figcaption></figcaption></figure>

## How to caculate printing price

Each printing method has its own way to calculate the price. The Lumise provide some options to enable that. **Allow setup price for each stage** In Design tab of a product base, you can create more stages for that product base. When Allow setup price for each stage is enabled, the printing price is applied for **all stages**, not only one stage.

1. **Calculate price with Text, Clipart, Images, Upload ( is uploaded image)**\
   For example,

* **Stage 1:** I set the prices are

<figure><img src="https://cdn.shopify.com/s/files/1/0021/5613/4482/files/a7.png?4369" alt=""><figcaption></figcaption></figure>

I suppose the original price of my product is **$200**, the quantity is 1 (in scope of 10)\
I use **3 Text** on Stage 1, It cost $1×3= $3 for printing\
I use **2 Clipart** on Stage 1, It costs $1×2=$2\
I use **1 Image** on Stage 1, It costs $1×1=$1\
–> Printing price are $6\
So the new price of my product is $100+$3+$2+$1= **$206**\
*Result:*

<figure><img src="https://cdn.shopify.com/s/files/1/0021/5613/4482/files/a4.png?4369" alt=""><figcaption></figcaption></figure>

If the quantity is increased from **11** to **15**, the price is **different**\
Printing price is: **$4×3 + $4×2 + $4×1 = $24.**&#x20;

<figure><img src="https://cdn.shopify.com/s/files/1/0021/5613/4482/files/a8.png?4371" alt=""><figcaption></figcaption></figure>

**Stage 2:** I set the prices are

<figure><img src="https://cdn.shopify.com/s/files/1/0021/5613/4482/files/a6.png?4369" alt=""><figcaption></figcaption></figure>

I use **3 Text** on Stage 2, It cost $2×3=$6 for printing\
I use **2 Clipart** on Stage 2, It costs $2×2=$4\
I use **1 Image** on Stage 2, It costs $2×1=$2\
So the new price of my product is **$212**\
*Result:*

<figure><img src="https://cdn.shopify.com/s/files/1/0021/5613/4482/files/a5.png?4369" alt=""><figcaption></figcaption></figure>

The quantity range is the similar to stage 1

{% hint style="info" %}
**2. Color Option is temporarily stopped working. We’re so sorry about this inconvenience.**\
\
**Hope you guys can try the other types.**
{% endhint %}

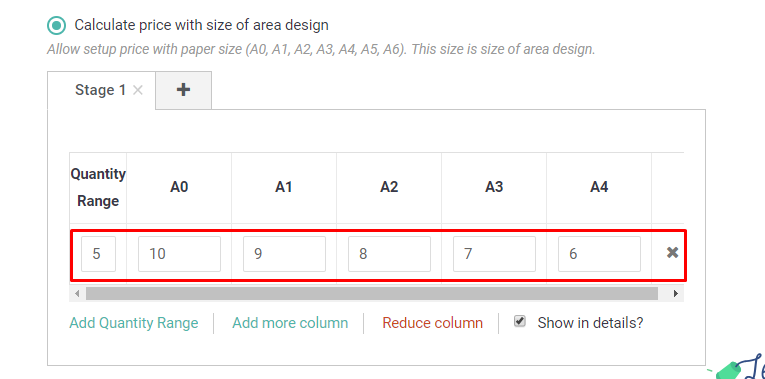
**3. Base on the size of print range : A1, A2,…A6**

I set the prices as:

<figure><img src="https://cdn.shopify.com/s/files/1/0021/5613/4482/files/Screenshot_1_04e2fcd3-82cb-43d6-a85e-3c6c3f5a4b3e.png?4395" alt=""><figcaption></figcaption></figure>

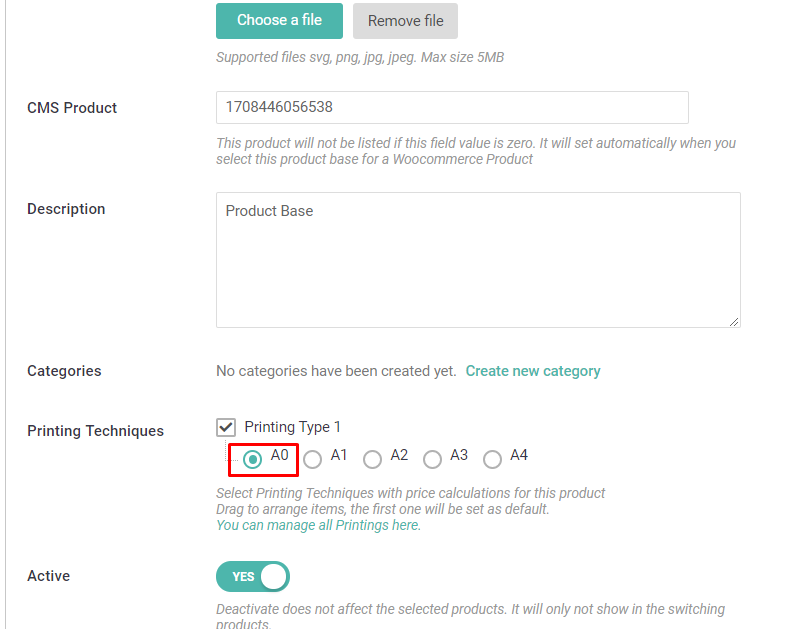
Go to **Product Base** to config, you also have to select one of these sizes here

<figure><img src="https://cdn.shopify.com/s/files/1/0021/5613/4482/files/Screenshot_32.png?4395" alt=""><figcaption></figcaption></figure>

After add some objects to design, we can see the price of printing

<figure><img src="https://cdn.shopify.com/s/files/1/0021/5613/4482/files/Screenshot_2_adab7e32-97c8-47cb-ad33-330405ddcb15.png?4395" alt=""><figcaption></figcaption></figure>

**4. Fixed price for each quantity**\
The price is fixed for all stages and all design objects.

<br>

<br>


# Cliparts

To manage **Clip art**, just go to **Admin panel > All Cliparts**

**Clipart** are a list of the Clipart which you prepare for users to select on their end. They can add them to product design with one click.\
To manage Clipart, just go to **Admin panel > Clipart**. In this page, you can see the **thumbnail of Clipart, name, categories and some filter options** on the top as well.

<figure><img src="https://cdn.shopify.com/s/files/1/0021/5613/4482/files/Screenshot_29.png?4070" alt=""><figcaption></figcaption></figure>

By default, it will show all items here. You can refine the list to show only specific Clipart by using the drop-down menus above the items list. The list auto refresh after you make a selection. **Bulk Actions:** You can also act on multiple items at once. Select the items you want to act on using the checkboxes> select an action> click **Apply** **Number of item per page**\
**Sort by**\
**Categories**

<figure><img src="https://cdn.shopify.com/s/files/1/0021/5613/4482/files/up_38ca1887-4609-42bd-bf54-a2349880d690.png?4070" alt=""><figcaption></figcaption></figure>

Set price for a Clipart

<figure><img src="https://cdn.shopify.com/s/files/1/0021/5613/4482/files/Screenshot_30.png?4070" alt=""><figcaption></figcaption></figure>

When you set a price for Clipart, It will show up on **Customer end.**

<figure><img src="https://cdn.shopify.com/s/files/1/0021/5613/4482/files/Screenshot_31.png?4070" alt=""><figcaption></figcaption></figure>

It’s also **counted** to price of the product. But to make the Clipart can be counted, you must create Printing Type first

<figure><img src="https://cdn.shopify.com/s/files/1/0021/5613/4482/files/Screenshot_27.png?4064" alt=""><figcaption></figcaption></figure>

Adding New Clipart

<figure><img src="https://cdn.shopify.com/s/files/1/0021/5613/4482/files/Screenshot_28.png?4065" alt=""><figcaption></figcaption></figure>

Add multi cliparts If you want to upload a big number of clipart items, let’s use **ulti upload features**

Just click on Add Multiple Cliparts button on the top of list page.

<br>


# Shapes

To manage **Clip art**, just go to **Admin panel > All Shapes**

**Cliparts** are a list of the Clipart which you prepare for users to select on their end. They can add them to product design with one click.\
To manage Shapes, just go to **Admin panel > Clipart**. In this page, you can see the **thumbnail of Clipart, name, categories and some filter options** on the top as well.

<figure><img src="https://cdn.shopify.com/s/files/1/0021/5613/4482/files/Screenshot_29.png?4070" alt=""><figcaption></figcaption></figure>

By default, it will show all items here. You can refine the list to show only specific Clipart by using the drop-down menus above the items list. The list auto refresh after you make a selection.\
**-Bulk Actions:** You can also act on multiple items at once. Select the items you want to act on using the checkboxes> select an action> click **Apply**\
**-Number of item per page**\
**-Sort by**\
**-Categories**

<figure><img src="https://cdn.shopify.com/s/files/1/0021/5613/4482/files/up_38ca1887-4609-42bd-bf54-a2349880d690.png?4070" alt=""><figcaption></figcaption></figure>

{% hint style="info" %}
*Note: Shapes are FREE to use, you can not set price for this type of object*
{% endhint %}

<br>


# Settings

**In General Tab** You can change the logo,URL, site title, Favicon, theme color

<figure><img src="https://cdn.shopify.com/s/files/1/0021/5613/4482/files/Screenshot_10_978ffbbc-6199-472a-8add-3a5e9dadef2a.png?4411" alt=""><figcaption></figcaption></figure>

*Result:*

<figure><img src="https://cdn.shopify.com/s/files/1/0021/5613/4482/files/Screenshot_11_f301dd67-32d8-49b7-b2f9-160846fdcee1.png?4411" alt=""><figcaption></figcaption></figure>

**In Editor tab** You can change some settings on **Customer end**

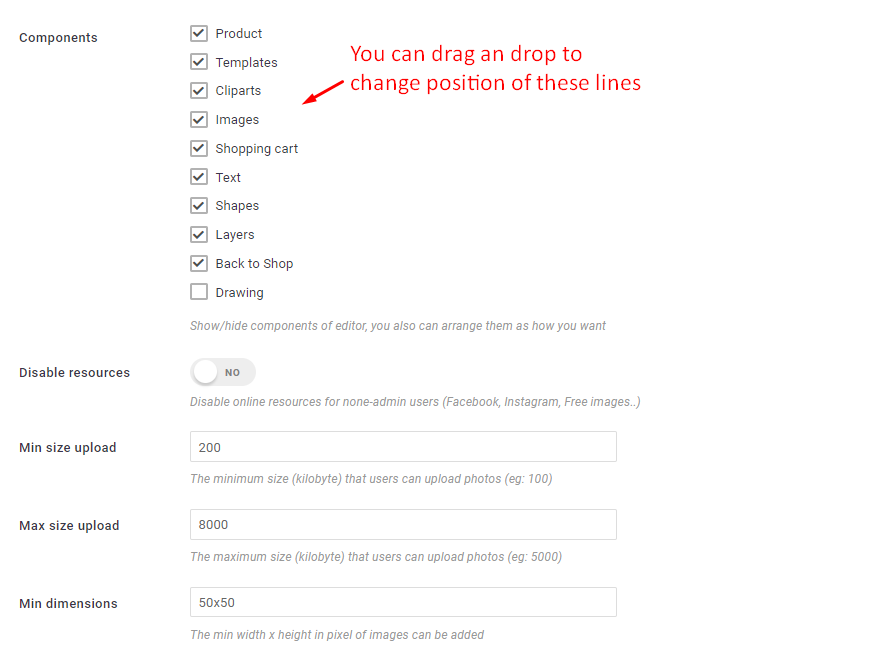
<figure><img src="https://cdn.shopify.com/s/files/1/0021/5613/4482/files/Screenshot_12_4b001f44-c943-42fa-b01e-987ee0a0c46f.png?4411" alt=""><figcaption></figcaption></figure>

<figure><img src="https://cdn.shopify.com/s/files/1/0021/5613/4482/files/Screenshot_13_b271781c-e8df-4c91-88d2-b20aa6264730.png?4411" alt=""><figcaption></figcaption></figure>

**In Shop tab**\
You can do setting to comply with the currency rule in your country

<figure><img src="https://cdn.shopify.com/s/files/1/0021/5613/4482/files/Screenshot_14_bd97a848-83cb-4853-b249-daab3448a602.png?4411" alt=""><figcaption></figcaption></figure>

\
**In Google font tab**\
You can set a number of font to show on Customer end

<figure><img src="https://cdn.shopify.com/s/files/1/0021/5613/4482/files/font.png?4412" alt=""><figcaption></figcaption></figure>

**In Shopify tab**

<figure><img src="https://cdn.shopify.com/s/files/1/0021/5613/4482/files/Screenshot_24_ecca60b1-4d32-48bf-9f1b-61ec17c14051.png?4447" alt=""><figcaption></figcaption></figure>

### **Language**

To set up Language for both **Customer end** and **Store Owner end**, firstly, please click on **Language** on the **left sidebar**

<figure><img src="https://cdn.shopify.com/s/files/1/0021/5613/4482/files/Screenshot_18_fa519412-f174-4f40-8600-aaf6d9a21d51.png?4442" alt=""><figcaption></figcaption></figure>

Click on **Add new language**

<figure><img src="https://cdn.shopify.com/s/files/1/0021/5613/4482/files/Screenshot_16_d22a1fb5-3148-4186-902d-2621e1d89c7b.png?4442" alt=""><figcaption></figcaption></figure>

Select a **flag icon according to your language**

<figure><img src="https://cdn.shopify.com/s/files/1/0021/5613/4482/files/Screenshot_22_7a33da7a-f849-4beb-8d80-a33aa1edcd0e.png?4443" alt=""><figcaption></figcaption></figure>

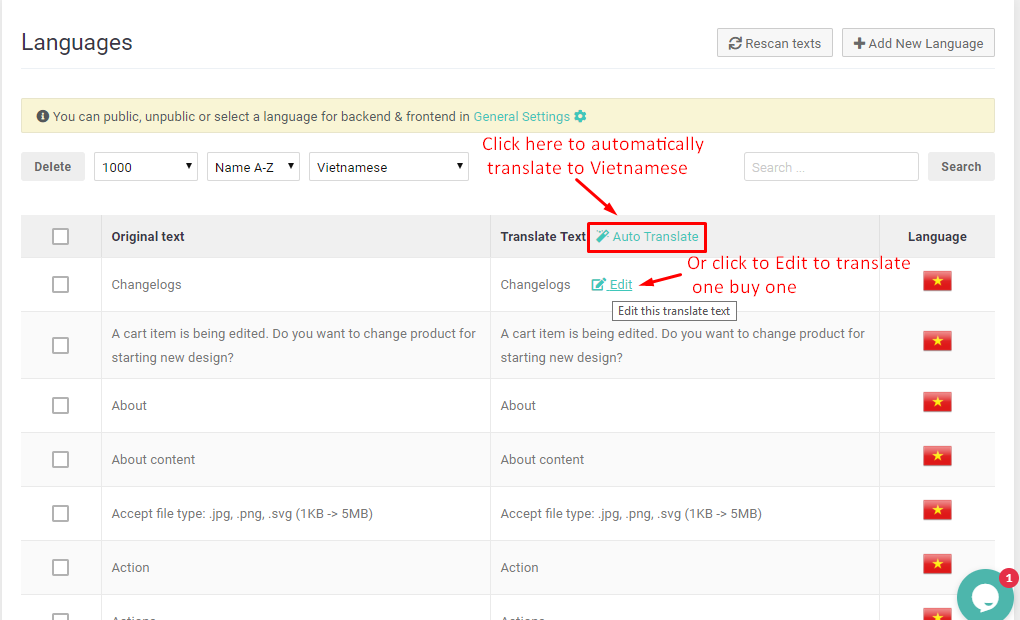
Create **translations**

<figure><img src="https://cdn.shopify.com/s/files/1/0021/5613/4482/files/Screenshot_19_ed954bcc-12e5-4921-b6b6-c505495452e5.png?4442" alt=""><figcaption></figcaption></figure>

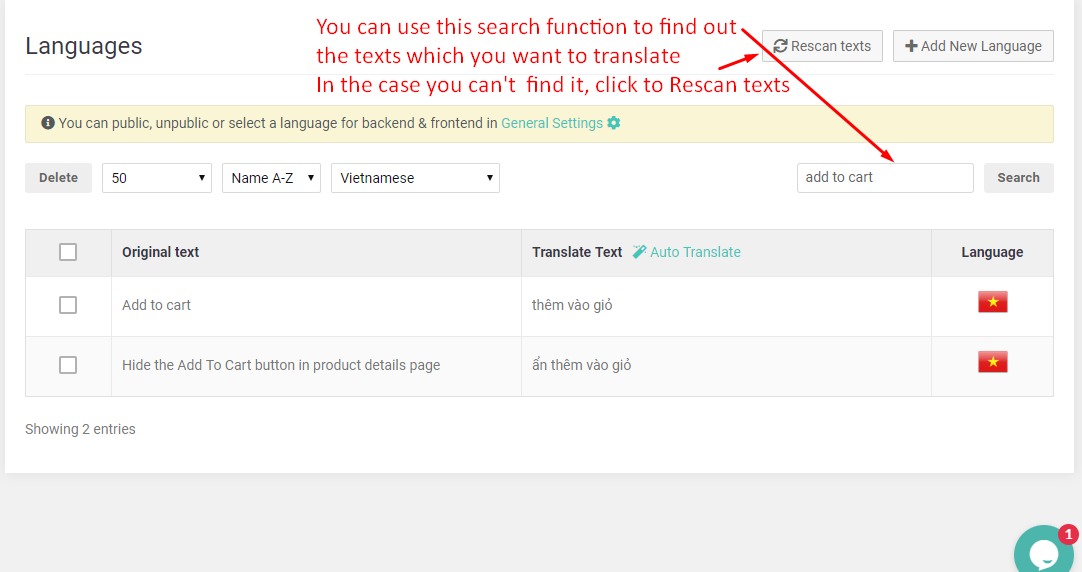
**Search** text function

<figure><img src="https://cdn.shopify.com/s/files/1/0021/5613/4482/files/Screenshot_23_d57a1b5d-4935-4d21-a72c-00c32d52ba59.png?4444" alt=""><figcaption></figcaption></figure>

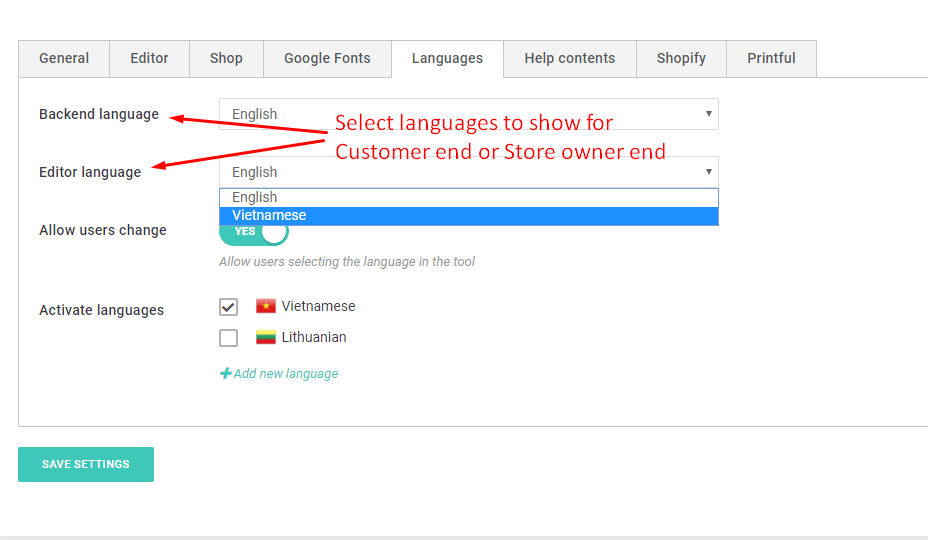
Go back to **Settings-> Language**

<figure><img src="https://cdn.shopify.com/s/files/1/0021/5613/4482/files/Screenshot_21_15d1a6ec-1206-4811-a408-c1ba75501cde.png?4442" alt=""><figcaption></figcaption></figure>

After saving you will see a **option** for new languages appear here

<figure><img src="https://cdn.shopify.com/s/files/1/0021/5613/4482/files/Screenshot_20_17d4e607-6bfb-4a86-a722-613ec74f440c.png?4445" alt=""><figcaption></figcaption></figure>


# Support

Don’t hesitate to contact us if you have any questions or concern via the live chat box here.

We’re online from 8am to 5pm (GMT +7), from Monday to Friday.

Please describe your issues clearly by **screenshots** and fill in your information to the chatbox, so we can also reply you **by email when you go offline!**

<figure><img src="https://wiki.the4.co/wp-content/uploads/2019/09/Screenshot_2-11.png" alt=""><figcaption></figcaption></figure>

Our goal is to give you a high quality product and an exemplary level of customer service. So please let us know about your thought and your issues. We’re happy to solve them and assist you as much as possible\
*Best Regards!*


# How to create Product Image/ Mask image

You can follow this video:

{% embed url="<https://vimeo.com/337225403?embedded=true&owner=98731461&source=video_title>" %}

If you need help with product image?

Pricing:

1-10: $3/image

10-50: $2/image

50\~1000: $1.5/image

Please contact <support@the4.co> to start this work and send us your original images.

We will help you generate them to suit your needs.